基础知识
基础知识
微服务是将一个原本独立的系统拆分成多个小型服务,这些小型服务都在各自独立的进程中运行。
单体系统的缺点:
- 修改一个小功能,就需要将整个系统重新部署上线,影响其他功能的运行;
- 功能模块互相依赖,强耦合,扩展困难。如果出现性能瓶颈,需要对整体应用进行升级,虽然影响性能的可能只是其中一个小模块;
单体系统的优点:
- 容易部署,程序单一,不存在分布式集群的复杂部署环境;
- 容易测试,没有复杂的服务调用关系。
微服务的优点:
- 不同的服务可以使用不同的技术;
- 隔离性。一个服务不可用不会导致其他服务不可用;
- 可扩展性。某个服务出现性能瓶颈,只需对此服务进行升级即可;
- 简化部署。服务的部署是独立的,哪个服务出现问题,只需对此服务进行修改重新部署;
微服务的缺点:
- 网络调用频繁。性能相对函数调用较差。
- 运维成本增加。系统由多个独立运行的微服务构成,需要设计一个良好的监控系统对各个微服务的运行状态进行监控。
springcloud是一个基于Spring Boot实现的微服务架构开发工具。spring cloud包含多个子项目:
- Spring Cloud Config:配置管理工具,支持使用Git存储配置内容, 可以使用它实现应用配置的外部化存储, 并支持客户端配置信息刷新、加密/解密配置内容等。
- Spring Cloud Netflix:核心 组件,对多个Netflix OSS开源套件进行整合。
- Eureka: 服务治理组件, 包含服务注册中心、服务注册与发现机制的实现。
- Hystrix: 容错管理组件,实现断路器模式, 帮助服务依赖中出现的延迟和为故障提供强大的容错能力。
- Ribbon: 客户端负载均衡的服务调用组件。
- Feign: 基于Ribbon 和Hystrix 的声明式服务调用组件。
- Zuul: 网关组件, 提供智能路由、访问过滤等功能。
- Archaius: 外部化配置组件。
- Spring Cloud Bus: 事件、消息总线, 用于传播集群中的状态变化或事件, 以触发后续的处理, 比如用来动态刷新配置等。
- Spring Cloud Cluster: 针对ZooKeeper、Redis、Hazelcast、Consul 的选举算法和通用状态模式的实现。
- Spring Cloud Consul: 服务发现与配置管理工具。
- Spring Cloud ZooKeeper: 基于ZooKeeper 的服务发现与配置管理组件。
- Spring Cloud Security:Spring Security组件封装,提供用户验证和权限验证,一般与Spring Security OAuth2 组一起使用,通过搭建授权服务,验证Token或者JWT这种形式对整个微服务系统进行安全验证
- Spring Cloud Sleuth:分布式链路追踪组件,他分封装了Dapper、Zipkin、Kibana 的组件
- Spring Cloud Stream:Spring Cloud框架的数据流操作包,可以封装RabbitMq,ActiveMq,Kafka,Redis等消息组件,利用Spring Cloud Stream可以实现消息的接收和发送
spring-boot-starter-actuator:该模块能够自动为Spring Boot 构建的应用提供一系列用于监控的端点。
说说对SpringBoot 和SpringCloud的理解
- SpringBoot专注于快速方便的开发单个个体微服务。
- SpringCloud是关注全局的微服务协调整理治理框架,它将SpringBoot开发的一个个单体微服务整合并管理起来,为各个微服务之间提供,配置管理、服务发现、断路器、路由、微代理、事件总线、全局锁、决策竞选、分布式会话等等集成服务
- SpringBoot可以离开SpringCloud独立使用开发项目,但是SpringCloud离不开SpringBoot,属于依赖的关系。
- SpringBoot专注于快速、方便的开发单个微服务个体,SpringCloud关注全局的服务治理框架。
Spring Boot可以离开Spring Cloud独立使用开发项目,但是Spring Cloud离不开Spring Boot,属于依赖的关系。
Spring Cloud Eureka
Spring Cloud Eureka实现微服务架构中的服务治理功能,使用 Netflix Eureka 实现服务注册与发现,包含客户端组件和服务端组件。服务治理是微服务架构中最为核心和基础的模块。
Eureka 服务端就是服务注册中心。Eureka 客户端用于处理服务的注册和发现。客户端服务通过注解和参数配置的方式,嵌入在客户端应用程序的代码中, 在应用程序运行时,Eureka客户端向注册中心注册自身提供的服务并周期性地发送心跳来更新它的服务租约。同时,它也能从服务端查询当前注册的服务信息并把它们缓存到本地并周期性地刷新服务状态。
服务注册与发现
服务注册:在微服务架构中往往会有一个注册中心,每个微服务都会向注册中心去注册自己的地址及端口信息,注册中心维护着服务名称与服务实例的对应关系。每个微服务都会定时从注册中心获取服务列表,同时汇报自己的运行情况,这样当有的服务需要调用其他服务时,就可以从自己获取到的服务列表中获取实例地址进行调用。
服务发现:服务间的调用不是通过直接调用具体的实例地址,而是通过服务名发起调用。调用方需要向服务注册中心咨询服务,获取服务的实例清单,从而访问具体的服务实例。
代码实例
添加依赖:
<dependency>
    <groupId>org.springframework.cloud</groupId>
    <artifactId>spring-cloud-starter-netflix-eureka-server</artifactId>
</dependency>
启动服务注册中心功能:
@EnableEurekaServer
@SpringBootApplication
public class EurekaServerApplication {
    public static void main(String[] args) {
        SpringApplication.run(EurekaServerApplication.class, args);
    }
}
在配置文件application.yml中添加Eureka注册中心的配置:
server:
  port: 8002
spring:
  application:
    name: eureka-server
eureka:
  instance:
    hostname: replica1
  client:
    serviceUrl:
      defaultZone: http://replica2:8003/eureka/ #注册到另一个Eureka注册中心
    fetch-registry: true
    register-with-eureka: true
运行EurekaServerApplication,访问地址http://localhost:8001/可以看到Eureka注册中心的界面。
高可用注册中心
注册中心互相注册,形成一组互相注册的服务注册中心, 以实现服务清单的互相同步, 达到高可用的效果。
创建application-replica1.yml和 application-replica2.yml:
-- application-replica1.yml
server:
  port: 8002
spring:
  application:
    name: eureka-server
eureka:
  instance:
    hostname: replica1
  client:
    serviceUrl:
      defaultZone: http://replica2:8003/eureka/ #注册到另一个Eureka注册中心
    fetch-registry: true

    register-with-eureka: true

-- application-replica2.yml
server:
  port: 8002
spring:
  application:
    name: eureka-server
eureka:
  instance:
    hostname: replica1
  client:
    serviceUrl:
      defaultZone: http://replica2:8003/eureka/ #注册到另一个Eureka注册中心
    fetch-registry: true

    register-with-eureka: true
修改hosts文件,让 serviceUrl 能在本地正确访问到:
127.0.0.1 replica1
127.0.0.1 replica2
通过spring.profiles.active属性来分别启动(或者设置idea -> edit configuration -> active profiles 属性):
java -jar eureka-server-1.0.0.jar --spring.profiles.active=replica1
java -jar eureka-server-1.0.0.jar --spring.profiles.active=replica2
在设置了多节点的服务注册中心之后, 服务提供方还需要做一些简单的配置才能将服务注册到Eureka Server 集群中:
eureka.client.serviceUrl.defaultZone=http://localhost:8002/eureka/, http://localhost:8003/eureka/
Spring Cloud Ribbon
Spring Cloud Ribbon 是基于HTTP和TCP的客户端负载均衡工具,基于Netflix Ribbon实现。Spring Cloud Ribbon 会将REST请求转换为客户端负载均衡的服务调用。
在客户端节点会维护可访问的服务器清单,服务器清单来自服务注册中心,通过心跳维持服务器清单的健康性。
开启客户端负载均衡调用:
- 服务提供者启动多个服务实例注册到服务注册中心;
- 服务消费者直接通过调用被@LoadBalanced 注解修饰过的RestTemplate 来实现面向服务的接口调用。
RestTemplate
RestTemplate是一个HTTP客户端,使用它我们可以方便的调用HTTP接口,支持GET、POST、PUT、DELETE等方法。
代码实例
创建hello-service模块,用于给 Ribbon 提供服务调用。
@RestController
public class HelloController {

    @Autowired
    private Registration registration;  // 服务注册

    @Autowired
    private DiscoveryClient client;

    private static final Logger LOGGER = LoggerFactory.getLogger(HelloController.class);

    @RequestMapping(value = "/hello", method = RequestMethod.GET)
    public String hello() throws Exception {
        ServiceInstance instance = client.getInstances(registration.getServiceId()).get(0);
        LOGGER.info("/hello, host:" + instance.getHost() + ", service_id:" + instance.getServiceId());
        return "Hello World";
    }
}
添加相关的依赖:
<dependency>
    <groupId>org.springframework.cloud</groupId>
    <artifactId>spring-cloud-starter-netflix-eureka-client</artifactId>
</dependency>
<dependency>
    <groupId>org.springframework.boot</groupId>
    <artifactId>spring-boot-starter-web</artifactId>
</dependency>
配置端口和注册中心地址:
spring.application.name=hello-service
eureka.client.serviceUrl.defaultZone=http://localhost:8002/eureka/, http://localhost:8003/eureka/
server.port=8081
创建ribbon-consumer模块,使用负载均衡调用hello-service服务。
添加相关依赖:
<dependency>
    <groupId>org.springframework.boot</groupId>
    <artifactId>spring-boot-starter-web</artifactId>
</dependency>
<dependency>
    <groupId>org.springframework.cloud</groupId>
    <artifactId>spring-cloud-starter-netflix-eureka-client</artifactId>
</dependency>
<dependency>
    <groupId>org.springframework.cloud</groupId>
    <artifactId>spring-cloud-starter-netflix-ribbon</artifactId>
</dependency>
配置了端口、注册中心地址。
spring.application.name=ribbon-consumer
server.port=9000
eureka.client.serviceUrl.defaultZone=http://localhost:8002/eureka/, http://localhost:8002/eureka/
hystrix.command.default.execution.isolation.thread.timeoutInMilliseconds=2000
service-url.hello-service = http://HELLO-SERVICE
使用@LoadBalanced注解赋予RestTemplate负载均衡的能力。
@Configuration
public class RibbonConfig {
    @Bean
    @LoadBalanced
    public RestTemplate restTemplate(){
        return new RestTemplate();
    }
}
创建ConsumerController,注入RestTemplate,使用其调用hello-service中提供的相关接口:
@RestController
public class ConsumerController {

    @Autowired
    RestTemplate restTemplate;

    @Value("${service-url.hello-service}")
    private String helloService;

    @RequestMapping(value="/ribbon-consumer", method = RequestMethod.GET)
    public String helloConsumer() {
        return restTemplate.getForEntity(helloService + "/hello", String.class).getBody();
    }
}
启动两个 hello-service 实例(8001/8002),调用接口 http://localhost:9000/ribbon-consumer 进行测试。
hello-service:8001和hello-service:8002交替输出:
com.tyson.helloservice.HelloController : /hello, host:DESKTOP-8F30VS1, service_id:HELLO-SERVICE
Spring Cloud Hystrix
在微服务架构中,服务与服务之间通过远程调用的方式进行通信,一旦某个被调用的服务发生了故障,其依赖服务也会发生故障,此时就会发生故障的蔓延,最终导致系统瘫痪。Hystrix实现了断路器模式,当某个服务发生故障时,通过断路器的监控,给调用方返回一个错误响应,而不是长时间的等待,这样就不会使得调用方由于长时间得不到响应而占用线程,从而防止故障的蔓延。Hystrix具备服务降级、服务熔断、线程隔离、请求缓存、请求合并及服务监控等强大功能。
代码实例
创建 hystrix-service 模块。添加相关依赖:
<dependency>
    <groupId>org.springframework.cloud</groupId>
    <artifactId>spring-cloud-starter-netflix-eureka-client</artifactId>
</dependency>
<dependency>
    <groupId>org.springframework.cloud</groupId>
    <artifactId>spring-cloud-starter-netflix-hystrix</artifactId>
</dependency>
<dependency>
    <groupId>org.springframework.boot</groupId>
    <artifactId>spring-boot-starter-web</artifactId>
</dependency>
配置 application.yml:
server:
  port: 8401
spring:
  application:
    name: hystrix-service
eureka:
  client:
    register-with-eureka: true
    fetch-registry: true
    service-url:
      defaultZone: http://localhost:8001/eureka/
service-url:
  user-service: http://user-service
在启动类上添加@EnableCircuitBreaker来开启Hystrix的断路器功能:
@EnableCircuitBreaker
@EnableDiscoveryClient
@SpringBootApplication
public class HystrixServiceApplication {

    public static void main(String[] args) {
        SpringApplication.run(HystrixServiceApplication.class, args);
    }
}
创建UserHystrixController接口用于调用user-service服务:
@GetMapping("/testFallback/{id}")
public CommonResult testFallback(@PathVariable Long id) {
    return userService.getUser(id);
}
在UserService中添加调用方法与服务降级方法,方法上需要添加@HystrixCommand注解:
@HystrixCommand(fallbackMethod = "getDefaultUser")
public CommonResult getUser(Long id) {
    return restTemplate.getForObject(userServiceUrl + "/user/{1}", CommonResult.class, id);
}

public CommonResult getDefaultUser(@PathVariable Long id) {
    User defaultUser = new User(-1L, "defaultUser", "123456");
    return new CommonResult<>(defaultUser);
}
关闭user-service服务测试 testFallback 接口,发现已经发生了服务降级。
Spring Cloud Feign
基于Netflix Feign 实现,整合了Spring Cloud Ribbon 与Spring Cloud Hystrix, 它提供了一种声明式服务调用的方式。
负载均衡功能
添加依赖:
<dependency>
    <groupId>org.springframework.cloud</groupId>
    <artifactId>spring-cloud-starter-netflix-eureka-client</artifactId>
</dependency>
<dependency>
    <groupId>org.springframework.cloud</groupId>
    <artifactId>spring-cloud-starter-openfeign</artifactId>
</dependency>
<dependency>
    <groupId>org.springframework.boot</groupId>
    <artifactId>spring-boot-starter-web</artifactId>
</dependency>
配置application.yml:
server:
  port: 8701
spring:
  application:
    name: feign-service
eureka:
  client:
    register-with-eureka: true
    fetch-registry: true
    service-url:
      defaultZone: http://localhost:8002/eureka/
在启动类上添加@EnableFeignClients注解来启用Feign的客户端功能:
@EnableFeignClients
@EnableDiscoveryClient
@SpringBootApplication
public class FeignServiceApplication {

    public static void main(String[] args) {
        SpringApplication.run(FeignServiceApplication.class, args);
    }

}
添加HelloService接口(与hello-service HelloController定义的接口一致),绑定hello-service服务接口:
@FeignClient(value="hello-service")
public interface HelloService {

    @RequestMapping(value = "/hello", method = RequestMethod.GET)
    String getHello();
}
添加HelloFeignController,调用UserService完成服务调用:
@RestController
@RequestMapping("feign")
public class HelloFeignController {
    @Autowired
    private HelloService helloService;

    @GetMapping("/hello")
    public String getHello() {
        return helloService.getHello();
    }
}
启动eureka-service,多个hello-service,feign-service服务,多次调用http://localhost:8701/feign/hello/进行测试。
服务降级功能
开启Hystrix功能:
feign:
  hystrix:
    enabled: true #在Feign中开启Hystrix
添加服务降级实现类:
@Component
public class HelloFallbackService implements HelloService {
    @Override
    public String getHello() {
        return "hello fallback";
    }
}
修改HelloService接口,设置服务降级处理类:
@FeignClient(value="hello-service", fallback = HelloFallbackService.class)
public interface HelloService {

    @GetMapping(value = "/hello")
    String getHello();
}
关闭hello-service服务,重新启动 feign-service,访问 http://localhost:8701/feign/hello 进行测试。
Spring Cloud Zuul
API网关,为微服务架构中的服务提供了统一的访问入口,客户端通过API网关访问相关服务。所有客户端的访问都通过它来进行路由及过滤。它实现了请求路由、负载均衡、校验过滤、服务容错、服务聚合等功能。
添加依赖:
<dependency>
    <groupId>org.springframework.cloud</groupId>
    <artifactId>spring-cloud-starter-netflix-eureka-client</artifactId>
</dependency>
<dependency>
    <groupId>org.springframework.cloud</groupId>
    <artifactId>spring-cloud-starter-netflix-zuul</artifactId>
</dependency>
配置application.yml:
server:
  port: 8801
spring:
  application:
    name: zuul-proxy
eureka:
  client:
    register-with-eureka: true
    fetch-registry: true
    service-url:
      defaultZone: http://localhost:8001/eureka/
启动API网关功能:
@EnableZuulProxy
@EnableDiscoveryClient
@SpringBootApplication
public class ZuulProxyApplication {

    public static void main(String[] args) {
        SpringApplication.run(ZuulProxyApplication.class, args);
    }

}
路由规则
将匹配/userService/**的请求路由到user-service服务上去,匹配/feignService/**的请求路由到feign-service上去。:
zuul:
  routes: #给服务配置路由
    user-service:
      path: /userService/**
    feign-service:
      path: /feignService/**
访问http://localhost:8801/userService/user/1可以发现请求路由到了user-service上了。
访问前缀
给网关路径添加前缀。
zuul:
  prefix: /proxy #给网关路由添加前缀
需要访问http://localhost:8801/proxy/user-service/user/1才能访问到user-service中的接口。
header过滤
默认情况下, Spring Cloud Zuul在请求路由时, 会过滤掉HTTP请求头信息中的一些敏感信息, 防止它们被传递到下游服务。默认的敏感头信息通过zuul.sensitiveHeaders参数定义,包括Cookie、Set-Cookie、Authorization三个属性。这样的话,由于Cookie等信息被过滤掉,会导致应用无法登录和鉴权。为了避免这种情况,可以将敏感头设置为空。
zuul:
  sensitive-headers:
也可以通过指定路由的参数来配置,仅对指定路由开启对敏感信息的传递,影响范围小,不至于引起其他服务的信息泄露。
#方法一:对指定路由开启自定义敏感头
zuul.routes.<router>.customSensitiveHeaders=true
#方法二:将指定路由的敏感头设置为空
zuul.routes.<router>.sensitiveHeaders=
重定向
客户端通过 Zuul 请求认证服务,认证成功之后重定向到一个欢迎页,但是发现重定向的这个欢迎页的 host 变成了这个认证服务的 host,而不是 Zuul 的 host,如下图所示,直接暴露了认证服务的地址,我们可以在配置里面解决掉这个问题。
zuul:
  -- 此处解决后端服务重定向导致用户浏览的 host 变成 后端服务的 host 问题
  add-host-header: true
查看路由信息
通过SpringBoot Actuator来查看Zuul中的路由信息。
在pom.xml中添加相关依赖:
<dependency>
    <groupId>org.springframework.boot</groupId>
    <artifactId>spring-boot-starter-actuator</artifactId>
</dependency>
修改zuul-proxy/application.yml,开启查看路由信息的断点:
management:
  endpoints:
    web:
      exposure:
        include: 'routes'
{
	"/proxy/userService/**": {
		"id": "user-service",
		"fullPath": "/proxy/userService/**",
		"location": "user-service",
		"path": "/**",
		"prefix": "/proxy/userService",
		"retryable": false,
		"customSensitiveHeaders": false,
		"prefixStripped": true
	},
	"/proxy/feignService/**": {
		"id": "feign-service",
		"fullPath": "/proxy/feignService/**",
		"location": "feign-service",
		"path": "/**",
		"prefix": "/proxy/feignService",
		"retryable": false,
		"customSensitiveHeaders": false,
		"prefixStripped": true
	}
}
过滤器
路由与过滤是Zuul的两大核心功能,路由功能负责将外部请求转发到具体的服务实例上去,是实现统一访问入口的基础,过滤功能负责对请求过程进行额外的处理,是请求校验过滤及服务聚合的基础。
过滤器类型
Zuul中有以下几种典型的过滤器类型。
- pre:在请求被路由到目标服务前执行,比如权限校验、打印日志等功能;
- routing:在请求被路由到目标服务时执行,这是使用Apache HttpClient或Netflix Ribbon构建和发送原始HTTP请求的地方;
- post:在请求被路由到目标服务后执行,比如给目标服务的响应添加头信息,收集统计数据等功能;
- error:请求在其他阶段发生错误时执行。
自定义过滤器
添加PreLogFilter类继承ZuulFilter。在请求被转发到目标服务前打印请求日志。
@Component
public class PreLogFilter extends ZuulFilter {
    private Logger LOGGER = LoggerFactory.getLogger(this.getClass());

    /**
     * 过滤器类型,有pre、routing、post、error四种。
     */
    @Override
    public String filterType() {
        return "pre";
    }

    /**
     * 过滤器执行顺序,数值越小优先级越高。
     */
    @Override
    public int filterOrder() {
        return 1;
    }

    /**
     * 是否进行过滤,返回true会执行过滤。
     */
    @Override
    public boolean shouldFilter() {
        return true;
    }

    /**
     * 自定义的过滤器逻辑,当shouldFilter()返回true时会执行。
     */
    @Override
    public Object run() throws ZuulException {
        RequestContext requestContext = RequestContext.getCurrentContext();
        HttpServletRequest request = requestContext.getRequest();
        String host = request.getRemoteHost();
        String method = request.getMethod();
        String uri = request.getRequestURI();
        LOGGER.info("Remote host:{},method:{},uri:{}", host, method, uri);
        return null;
    }
}
添加过滤器后,访问http://localhost:8801/proxy/user-service/user/1,会打印如下日志:
Remote host:0:0:0:0:0:0:0:1,method:GET,uri:/proxy/userService/user/1
禁用过滤器
在application.yml配置:
zuul:
  PreLogFilter:
    pre:
      disable: true
Ribbon和Hystrix的支持
由于Zuul自动集成了Ribbon和Hystrix,所以Zuul天生就有负载均衡和服务容错能力,我们可以通过Ribbon和Hystrix的配置来配置Zuul中的相应功能。
可以使用Hystrix的配置来设置路由转发时HystrixCommand的执行超时时间:
hystrix:
  command: #用于控制HystrixCommand的行为
    default:
      execution:
        isolation:
          thread:
            timeoutInMilliseconds: 1000 #配置HystrixCommand执行的超时时间,执行超过该时间会进行服务降级处理
可以使用Ribbon的配置来设置路由转发时请求连接及处理的超时时间:
ribbon: #全局配置
  ConnectTimeout: 1000 #服务请求连接超时时间(毫秒)
  ReadTimeout: 3000 #服务请求处理超时时间(毫秒)
常用配置
zuul:
  routes: #给服务配置路由
    user-service:
      path: /userService/**
    feign-service:
      path: /feignService/**
  ignored-services: user-service,feign-service #关闭默认路由配置
  prefix: /proxy #给网关路由添加前缀
  sensitive-headers: Cookie,Set-Cookie,Authorization #配置过滤敏感的请求头信息,设置为空就不会过滤
  add-host-header: true #设置为true重定向是会添加host请求头
  retryable: true # 关闭重试机制
  PreLogFilter:
    pre:
      disable: false #控制是否启用过滤器
Spring Cloud Gateway
为 SpringBoot 应用提供了API网关支持,具有强大的智能路由与过滤器功能。
创建api-gateway模块,pom.xml添加依赖:
<dependency>
    <groupId>org.springframework.cloud</groupId>
    <artifactId>spring-cloud-starter-gateway</artifactId>
</dependency>
配置路由
Gateway 提供了两种不同的方式用于配置路由,一种是通过yml文件来配置,另一种是通过Java Bean来配置。
使用yml配置。修改application.yml。
server: port: 9201 service-url: user-service: http://localhost:8201 spring: cloud: gateway: routes: - id: path_route #路由的ID uri: ${service-url.user-service}/user/{id} #匹配后路由地址 predicates: # 断言,路径相匹配的进行路由 - Path=/user/{id}启动eureka-server,user-service和api-gateway服务,测试http://localhost:9201/user/1
使用Java bean配置。
添加相关配置类,并配置一个RouteLocator对象:
@Configuration public class GatewayConfig { @Bean public RouteLocator customRouteLocator(RouteLocatorBuilder builder) { return builder.routes() .route("path_route2", r -> r.path("/user/getByUsername") .uri("http://localhost:8201/user/getByUsername")) .build(); } }使用http://localhost:9201/user/getByUsername?username=macro测试。
Route Predicate
Spring Cloud Gateway包括许多内置的Route Predicate工厂。 所有这些Predicate都与HTTP请求的不同属性匹配。 多个Route Predicate工厂可以进行组合。
After Route Predicate
在指定时间之后的请求会匹配该路由。
spring:
  cloud:
    gateway:
      routes:
        - id: after_route
          uri: ${service-url.user-service}
          predicates:
            - After=2019-09-24T16:30:00+08:00[Asia/Shanghai]
Cookie Route Predicate
带有指定Cookie的请求会匹配该路由。
spring:
  cloud:
    gateway:
      routes:
        - id: cookie_route
          uri: ${service-url.user-service}
          predicates:
            - Cookie=username,tyson
使用curl工具发送带有cookie为username=macro的请求可以匹配该路由。
curl http://localhost:9201/user/1 --cookie "username=tyson"
Header Route Predicate
带有指定请求头的请求会匹配该路由。
spring:
  cloud:
    gateway:
      routes:
      - id: header_route
        uri: ${service-url.user-service}
        predicates:
        - Header=X-Request-Id, \d+
使用curl工具发送带有请求头为X-Request-Id:123的请求可以匹配该路由。
curl http://localhost:9201/user/1 -H "X-Request-Id:123"
Host Route Predicate
带有指定Host的请求会匹配该路由。
spring:
  cloud:
    gateway:
      routes:
        - id: host_route
          uri: ${service-url.user-service}
          predicates:
            - Host=**.macrozheng.com
使用curl工具发送带有请求头为Host:www.macrozheng.com的请求可以匹配该路由。
curl http://localhost:9201/user/1 -H "Host:www.macrozheng.com"
Route Filter
路由过滤器可用于修改进入的HTTP请求和返回的HTTP响应,路由过滤器只能指定路由进行使用。Spring Cloud Gateway 内置了多种路由过滤器,他们都由GatewayFilter的工厂类来产生。
AddRequestParameter GatewayFilter
给请求添加参数的过滤器。
spring:
  cloud:
    gateway:
      routes:
        - id: add_request_parameter_route
          uri: http://localhost:8201
          filters:
            - AddRequestParameter=username, macro
          predicates:
            - Method=GET
以上配置会对GET请求添加username=macro的请求参数,通过curl工具使用以下命令进行测试。
curl http://localhost:9201/user/getByUsername
相当于发起该请求:
curl http://localhost:8201/user/getByUsername?username=macro
StripPrefix GatewayFilter
对指定数量的路径前缀进行去除的过滤器。
spring:
  cloud:
    gateway:
      routes:
      - id: strip_prefix_route
        uri: http://localhost:8201
        predicates:
        - Path=/user-service/**
        filters:
        - StripPrefix=2
以上配置会把以/user-service/开头的请求的路径去除两位,通过curl工具使用以下命令进行测试。
curl http://localhost:9201/user-service/a/user/1
相当于发起请求:curl http://localhost:8201/user/1
PrefixPate GatewayFilter
与StripPrefix过滤器恰好相反,会对原有路径进行增加操作的过滤器。
spring:
  cloud:
    gateway:
      routes:
      - id: prefix_path_route
        uri: http://localhost:8201
        predicates:
        - Method=GET
        filters:
        - PrefixPath=/user
以上配置会对所有GET请求添加/user路径前缀。
Hystrix GatewayFilter
将断路器功能添加到网关路由中,使服务免受级联故障的影响,并提供服务降级处理。
要开启断路器功能,我们需要在pom.xml中添加Hystrix的相关依赖:
<dependency>
    <groupId>org.springframework.cloud</groupId>
    <artifactId>spring-cloud-starter-netflix-hystrix</artifactId>
</dependency>
然后添加相关服务降级的处理类:
@RestController
public class FallbackController {

    @GetMapping("/fallback")
    public Object fallback() {
        Map<String,Object> result = new HashMap<>();
        result.put("data",null);
        result.put("message","Get request fallback!");
        result.put("code",500);
        return result;
    }
}
RequestRateLimiter GatewayFilter
用于限流,使用RateLimiter实现来确定是否允许当前请求继续进行,如果请求太大默认会返回HTTP 429-太多请求状态。
在pom.xml中添加相关依赖:
<dependency>
    <groupId>org.springframework.boot</groupId>
    <artifactId>spring-boot-starter-data-redis-reactive</artifactId>
</dependency>
添加限流策略的配置类,这里有两种策略一种是根据请求参数中的username进行限流,另一种是根据访问IP进行限流。
@Configuration
public class RedisRateLimiterConfig {
    @Bean
    KeyResolver userKeyResolver() {
        return exchange -> Mono.just(exchange.getRequest().getQueryParams().getFirst("username"));
    }

    @Bean
    public KeyResolver ipKeyResolver() {
        return exchange -> Mono.just(exchange.getRequest().getRemoteAddress().getHostName());
    }
}
我们使用Redis来进行限流,所以需要添加Redis和RequestRateLimiter的配置,这里对所有的GET请求都进行了按IP来限流的操作。
server:
  port: 9201
spring:
  redis:
    host: localhost
    password: 123456
    port: 6379
  cloud:
    gateway:
      routes:
        - id: requestratelimiter_route
          uri: http://localhost:8201
          filters:
            - name: RequestRateLimiter
              args:
                redis-rate-limiter.replenishRate: 1 #每秒允许处理的请求数量
                redis-rate-limiter.burstCapacity: 2 #每秒最大处理的请求数量
                key-resolver: "#{@ipKeyResolver}" #限流策略,对应策略的Bean
          predicates:
            - Method=GET
logging:
  level:
    org.springframework.cloud.gateway: debug
多次请求该地址:http://localhost:9201/user/1 ,会返回状态码为429的错误。
Retry GatewayFilter
对路由请求进行重试的过滤器,可以根据路由请求返回的HTTP状态码来确定是否进行重试。
spring:
  cloud:
    gateway:
      routes:
      - id: retry_route
        uri: http://localhost:8201
        predicates:
        - Method=GET
        filters:
        - name: Retry
          args:
            retries: 1 #需要进行重试的次数
            statuses: BAD_GATEWAY #返回哪个状态码需要进行重试,返回状态码为5XX进行重试
            backoff:
              firstBackoff: 10ms
              maxBackoff: 50ms
              factor: 2
              basedOnPreviousValue: false
结合注册中心使用
使用动态路由
以服务名为路径创建动态路由。
在pom.xml中添加依赖:
<dependency>
    <groupId>org.springframework.cloud</groupId>
    <artifactId>spring-cloud-starter-netflix-eureka-client</artifactId>
</dependency>
添加application-eureka.yml配置文件:
server:
  port: 9201
spring:
  application:
    name: api-gateway
  cloud:
    gateway:
      discovery:
        locator:
          enabled: true #开启从注册中心动态创建路由的功能
          lower-case-service-id: true #使用小写服务名,默认是大写
eureka:
  client:
    service-url:
      defaultZone: http://localhost:8001/eureka/
logging:
  level:
    org.springframework.cloud.gateway: debug
使用application-eureka.yml配置文件启动api-gateway服务,访问http://localhost:9201/user-service/user/1 ,可以路由到user-service的http://localhost:8201/user/1 处。
使用过滤器
在结合注册中心使用过滤器的时候,需要注意的是uri的协议为lb,这样才能启用Gateway的负载均衡功能。
修改application-eureka.yml文件,使用了PrefixPath过滤器,会为所有GET请求路径添加/user路径并路由。
server:
  port: 9201
spring:
  application:
    name: api-gateway
  cloud:
    gateway:
      routes:
        - id: prefixpath_route
          uri: lb://user-service #此处需要使用lb协议
          predicates:
            - Method=GET
          filters:
            - PrefixPath=/user
      discovery:
        locator:
          enabled: true
eureka:
  client:
    service-url:
      defaultZone: http://localhost:8001/eureka/
logging:
  level:
    org.springframework.cloud.gateway: debug
使用application-eureka.yml配置文件启动api-gateway服务,访问http://localhost:9201/1 ,可以路由到user-service的http://localhost:8201/user/1 处。
Spring Cloud Config
Spring Cloud Config分为服务端和客户端。服务端也称为分布式配置中心,它是个独立的微服务应用,用于从配置仓库获取配置信息供客户端使用。而客户端则是微服务架构中的各个微服务应用或者基础设施,可以从配置中心获取配置信息,在启动时加载配置。Spring Cloud Config 的配置中心默认采用Git来存储配置信息。
准备配置信息
在Git仓库中添加好配置文件。
master分支下的配置信息:
config:
  info: "config info for dev(master)"
配置中心
创建config-server模块,在pom.xml中添加依赖:
<dependency>
    <groupId>org.springframework.cloud</groupId>
    <artifactId>spring-cloud-config-server</artifactId>
</dependency>
<dependency>
    <groupId>org.springframework.cloud</groupId>
    <artifactId>spring-cloud-starter-netflix-eureka-client</artifactId>
</dependency>
在application.yml中进行配置:
server:
  port: 8901
spring:
  application:
    name: config-server
  cloud:
    config:
      server:
        git: #配置存储配置信息的Git仓库
          uri: https://gitee.com/macrozheng/springcloud-config.git
          username: macro
          password: 123456
          clone-on-start: true #开启启动时直接从git获取配置
eureka:
  client:
    service-url:
      defaultZone: http://localhost:8001/eureka/
在启动类添加@EnableConfigServer启动配置中心的功能。
@EnableConfigServer
@EnableDiscoveryClient
@SpringBootApplication
public class ConfigServerApplication {
    public static void main(String[] args) {
        SpringApplication.run(ConfigServerApplication.class, args);
    }
}
获取配置信息
访问http://localhost:8901/master/config-dev来获取master分支上dev环境的配置信息。
{
    "name":"master",
    "profiles":[
        "config-dev"
    ],
    "label":null,
    "version":"caf6549c807a6dde1fbbe399ffca18dc886ac03d",
    "state":null,
    "propertySources":[
    ]
}
访问http://localhost:8901/master/config-dev.yml来获取master分支上dev环境的配置文件信息。
config:
  info: config info for dev(master)
创建config-client模块,在 pom.xml 中添加相关依赖。
<dependency>
    <groupId>org.springframework.cloud</groupId>
    <artifactId>spring-cloud-starter-config</artifactId>
</dependency>
<dependency>
    <groupId>org.springframework.cloud</groupId>
    <artifactId>spring-cloud-starter-netflix-eureka-client</artifactId>
</dependency>
<dependency>
    <groupId>org.springframework.boot</groupId>
    <artifactId>spring-boot-starter-web</artifactId>
</dependency>
配置application.yml。
server:
  port: 9001
spring:
  application:
    name: config-client
  cloud:
    config: #Config客户端配置
      profile: dev #启用配置后缀名称
      label: dev #分支名称
      uri: http://localhost:8901 #配置中心地址
      name: config #配置文件名称
eureka:
  client:
    service-url:
      defaultZone: http://localhost:8001/eureka/
添加ConfigClientController用于获取配置。
@RestController
public class ConfigClientController {

    @Value("${config.info}")
    private String configInfo;

    @GetMapping("/configInfo")
    public String getConfigInfo() {
        return configInfo;
    }
}
启动config-client服务,访问http://localhost:9001/configInfo,可以获取到dev分支下dev环境的配置。
刷新配置
当Git仓库中的配置信息更改后,我们可以通过SpringBoot Actuator的refresh端点来刷新客户端配置信息。
config-client增加依赖:
<dependency>
   <groupId>org.springframework.boot</groupId>
   <artifactId>spring-boot-starter-actuator</artifactId>
</dependency>
application.yml开启refresh端点:
management:
  endpoints:
    web:
      exposure:
        include: 'refresh'
在ConfigClientController类添加@RefreshScope注解用于刷新配置:
@RestController
@RefreshScope
public class ConfigClientController {

    @Value("${config.info}")
    private String configInfo;

    @GetMapping("/configInfo")
    public String getConfigInfo() {
        return configInfo;
    }
}
重新启动config-client后,调用refresh端点进行配置刷新。
访问http://localhost:9001/configInfo进行测试,可以发现配置信息已经刷新。
安全认证
创建config-security-server模块,在pom.xml中添加相关依赖:
<dependency>
    <groupId>org.springframework.cloud</groupId>
    <artifactId>spring-cloud-config-server</artifactId>
</dependency>
<dependency>
    <groupId>org.springframework.boot</groupId>
    <artifactId>spring-boot-starter-security</artifactId>
</dependency>
在application.yml中进行配置:
server:
  port: 8905
spring:
  application:
    name: config-security-server
  cloud:
    config:
      server:
        git:
          uri: https://gitee.com/macrozheng/springcloud-config.git
          username:
          password:
          clone-on-start: true #开启启动时直接从git获取配置
  security: #配置用户名和密码
    user:
      name:
      password:
然后启动config-security-server服务。
修改config-client的配置(添加application-security.yml配置文件,主要是配置了配置中心的用户名和密码):
server:
  port: 9002
spring:
  application:
    name: config-client
  cloud:
    config:
      profile: dev #启用配置后缀名称
      label: dev #分支名称
      uri: http://localhost:8905 #配置中心地址
      name: config #配置文件名称
      username:
      password:
使用application-security.yml启动config-client服务。访问http://localhost:9002/configInfo进行测试。
配置中心集群
在微服务架构中,所有服务都从配置中心获取配置,配置中心一旦宕机,会发生很严重的问题。通过搭建配置中心集群避免该问题。
启动两个config-server分别运行在8902和8903端口上;
添加config-client的配置文件application-cluster.yml,主要是添加了从注册中心获取配置中心地址的配置并去除了配置中心uri的配置:
spring:
  cloud:
    config:
      profile: dev #启用环境名称
      label: dev #分支名称
      name: config #配置文件名称
      discovery:
        enabled: true
        service-id: config-server
eureka:
  client:
    service-url:
      defaultZone: http://localhost:8001/eureka/
Spring Cloud Bus
我们通常会使用消息代理来构建一个主题,然后把微服务架构中的所有服务都连接到这个主题上去,当我们向该主题发送消息时,所有订阅该主题的服务都会收到消息并进行消费。使用 Spring Cloud Bus 可以方便地构建起这套机制,所以 Spring Cloud Bus 又被称为消息总线。Spring Cloud Bus 配合 Spring Cloud Config 使用可以实现配置的动态刷新。
Spring Cloud Security
Spring Cloud Security 为构建安全的SpringBoot应用提供了一系列解决方案,结合Oauth2可以实现单点登录、令牌中继、令牌交换等功能。
OAuth 是一个验证授权(Authorization)的开放标准,所有人都有基于这个标准实现自己的OAuth。在OAuth之前,使用的是HTTP Basic Authentication(在浏览网页时候,浏览器会弹出一个登录验证的对话框),需要用户输入用户名和密码的形式进行验证, 这种形式是不安全的。OAuth的出现就是为了解决访问资源的安全性以及灵活性。OAuth使得第三方应用对资源的访问更加安全。
适用场景:OAuth 2.0
有一个"云冲印"的网站,可以将用户储存在Google的照片,冲印出来。用户为了使用该服务,必须让"云冲印"读取自己储存在Google上的照片。传统方法是,用户将自己的Google用户名和密码,告诉"云冲印",后者就可以读取用户的照片了。但是这种方法可能会导致用户密码泄露等问题。
OAuth在"客户端"(云冲印)与"服务提供商"(谷歌)之间,设置了一个授权层(authorization layer)。"客户端"不能直接登录"服务提供商",只能登录授权层,以此将用户与客户端区分开来。"客户端"登录授权层所用的令牌(token),与用户的密码不同。用户可以在登录的时候,指定授权层令牌的权限范围和有效期。
"客户端"登录授权层以后,"服务提供商"根据令牌的权限范围和有效期,向"客户端"开放用户储存的资料。
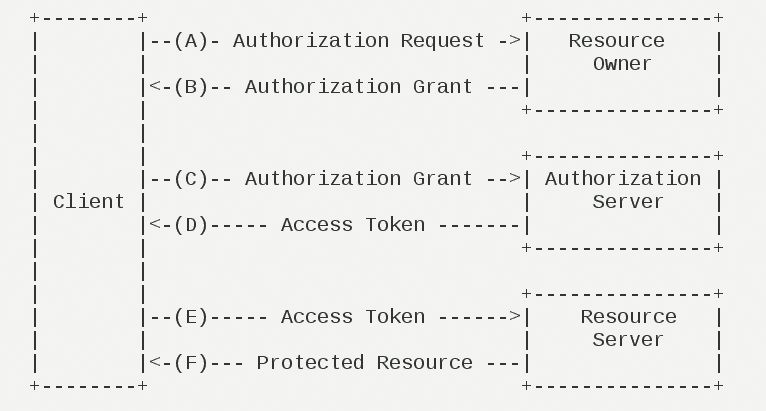
(A)用户打开客户端以后,客户端要求用户给予授权。
(B)用户同意给予客户端授权。
(C)客户端使用上一步获得的授权,向认证服务器申请令牌。
(D)认证服务器对客户端进行认证以后,确认无误,同意发放令牌。
(E)客户端使用令牌,向资源服务器申请获取资源。
(F)资源服务器确认令牌无误,同意向客户端开放资源。